It has long been customary to install a weather vane with their own hands in cities on the sea coast to measure the direction and strength of the wind. Having made a weather vane with his own hands, the owner of the house made his home recognizable, introduced an original decorative element into his exterior decoration. By installing a vane for a chimney with a deflector yourself, the owner of the house increases the efficiency and level of protection of the chimney.

A weather vane mounted on a chimney can perform several functions at once
Content
The device, types and functions of the weather vane on the chimney pipe
To make an attractive weather vane for a chimney, do-it-yourself drawings will be required without fail, they should display the main elements of the device. It is composed of the following components:
- housing - the base into which the axis is inserted. The body will be mounted on a chimney;
- bearing located in the housing. It is in it that the axis is inserted, the bearing allows it to rotate freely when the wind blows;
- indicator of the cardinal points. It is carried out in the form of two bars crossed at right angles. At the ends of the rods are applied lettering of the cardinal points. The pointer is oriented using a compass;
- a vertically located axis of the same diameter with a bearing through which it is inserted into the housing;
- a cap on a vane axis representing a cone or circle. Its purpose is to prevent moisture from entering the case;
- a flag on the vane axis in the form of a small blade. It is a flag driven by gusts of wind that indicates the direction of wind flows. The flag is considered as the main field for the implementation of ideas in the field of decoration, when installing a weather vane on the chimney with your own hands;
- counterweight mounted on the opposite side of the flag to balance it.

The design of the weather vane is quite simple and does not include any specific elements.
Before you begin to perform drawings for the weather vane on the chimney, it is worth deciding on a number of questions. First of all, what type of device will be installed:
- decorative. Its main purpose will be to give originality to the exterior of the building, while the main functions can be completely neglected;
- normal to determine the direction of the wind;
- Wilde weather vane, in the configuration of which there is a small propeller or suspension (suspended plate). Using the Wilde weather vane, both the direction of the wind and the force of the wind flow are determined (by the deviation of the plate from the vertical position, taken as a zero value), and they are also frightened off by a rotating bird propeller;
- meteorological. Forged meteorological weather vane in good faith informs amateur meteorologists the exact direction of the wind;
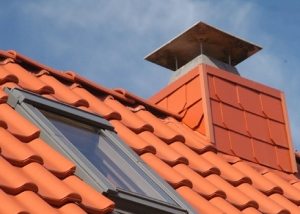
- chimney. The weather vane on the chimney is made so that its casing does not allow it to get inside the precipitation, debris and birds. By installing a chimney weather vane with your own hands with a rotating base, it is possible to achieve such an important effect as preventing the penetration of precipitation and back draft, which can even extinguish the furnace.
Having made a weather vane with your own hands, it is possible to give it a number of functions:
- protecting the chimney from the penetration of precipitation and gusts of wind;
- scaring away birds that seek to equip nests in warm places;
- wind direction indications;
- definition of cardinal points;
- determination of wind strength;
- a decorative element that adorns the roof and the building as a whole, giving it originality and recognition, originality.

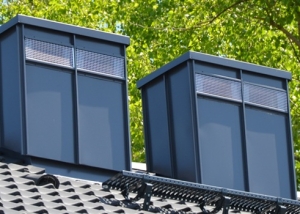
Choosing an original design for a weather vane, you can make your home unique
Selection of materials and tools and manufacturing of a stove for a chimney pipe
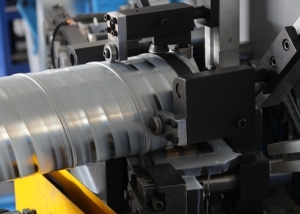
Having decided to install a weather vane in the chimney, having done the necessary drawings, we proceed to the selection of materials for manufacturing. A deflector for a chimney with your own hands, combined with a weather vane, should be:
- light
- durable;
- corrosion resistant.
Based on these requirements, we stop the choice on:
- galvanized steel;
- sheet iron;
- of stainless steel;
- forged metal;
- metal profile;
- copper.
The amount of materials depends on the size of the structure, which is usually performed with a height of 700-800 mm and a width of 400-500 mm.
For manufacturing, you will need to use the following tools:
- drills;
- wrench;
- file;
- scissors for metal;
- welding machine (subject to welded joints).

For a weather vane, it is best to use corrosion-resistant metal, and parts can be assembled with screws
The weather vane manufacturing sequence is as follows:
- The case is made of a metal pipe, the length of which is 130 mm, and the diameter is 13-15 mm. A bearing of a suitable diameter is mounted on the thread in the upper part of the pipe.
- Of the two narrow steel strips fastened at the intersection at an angle of 90º, an index of the cardinal points is made. For this wind rose, letters are cut out and painted to indicate the cardinal points (north, C or N, it is customary to color blue, south, south or S - red). Instead of letters, figures can be used that symbolize something important from the point of view of the owner of the house or simply meet his aesthetic preferences. Making the device simpler, you can limit yourself to coloring the tips of the pointers. The pointer is attached to the body by welding, but you will need to use the compass for proper alignment.
- For the manufacture of the vertical axis, smooth reinforcement is required. Having welded a cap to the tip at the place of exit from the pipe, the path for moisture penetration is blocked. For this purpose, it is also possible to use a rubber seal.
- To cut a flag, it is worth doing a pattern on cardboard in advance. A cardboard pattern is placed on a metal sheet and a contour is drawn. Cut along the contour is slowly and accurately, avoiding the appearance of chipping.
- The checkbox is attached to the top of the vertical axis. Using a counterweight, we make the necessary balancing to set the flag strictly in a horizontal position.
- Assembly of all structural elements is carried out, which can be supplemented by vertical propellers. Not only will they set in motion the figures adorning the flag, but they will also scare away the birds. It is possible to use coinage for metal, the relief of the surface of the weather vane will give the impression of volume.
Note! The bearing must be lubricated with solid oil (lithol) to ensure smooth movement of the vertical axis.

The weather vane-deflector will contribute to increased draft in the chimney
How to install a vane deflector on a chimney
The accuracy of the weather vane as a meteorological device depends on the installation height above the surface. Accurate readings will be achieved when installed at a minimum 12-meter height.
By installing the structure on the chimney, they achieve the fact that air flows cannot penetrate into the chimney, encountering an obstacle in the form of a conical upper hood.The right choice of design even allows you to achieve improved traction due to swirling flows. The design of the deflector with a weather vane allows you to achieve increased traction even with a wind blowing from below. The structure connected to the deflector by rotation of the mechanism and the cone creates turbulence, prevents the penetration of wind into the pipe and enhances traction.
Since the structure is made of metal, in the winter time ice will inevitably occur due to the formation of condensate when steam is released, which is considered to be an irreparable defect. The problem is solved by preventing moisture from entering the bearing, periodic lubrication, and tracking the formation of ice. Condensate is removed from the inner surface by special droppers that prevent it from entering the pipe. The problem of corrosion of the rotating parts is prevented by their coloring.
Important! It is generally accepted that a deflector with a weather vane demonstrates proper efficiency only if installed on a direct chimney coming from a solid fuel boiler (furnace).
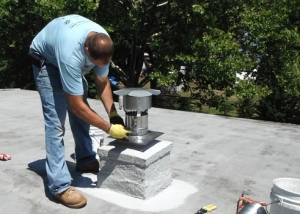
Installation is carried out in three stages:
- The cylinder is put on.
- The cylinder is fixed with fasteners.
- Clamps fasten the cap and diffuser.
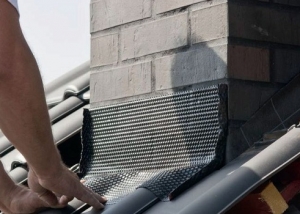
When installing, follow these rules:
- if the deflector has a round section, and the pipe has a rectangular (square) profile, then adapter pipes will be required;
- fastening the deflector to a large-diameter pipe is carried out to the inside using transition legs;
- The cap is fixed to the cylinder so that it forms an inverse cone. Then the design will work efficiently, regardless of changes in wind speed and direction.
Hand-made manufacture of a weather vane is a relatively simple task, the only one requiring a clear idea of the purpose and consistent execution of technological operations. As a result, a nice device will appear that gives the building its original look.