DIY drainage of a summer cottage is a combination of operations, the implementation of which becomes absolutely necessary when its owner is faced with problems of excessive humidity and is going to solve them on his own. It is possible to cope with a high level of occurrence of groundwater and the removal of moisture from the lowland without involving outside help if you find the right approach in finding a way out of the situation.

Drainage system - a necessary measure if there is a threat of flooding of the site and buildings on it
Content
- 1 What is the purpose of drainage at a summer cottage?
- 2 When you have to do the drainage of the cottage
- 3 How to determine the need for drainage on the site with your own hands
- 4 Some requirements of regulatory documents for the drainage of the site with your own hands
- 5 The choice of drainage system
- 6 Designing and conducting surface linear drainage
- 7 Designing and conducting deep drainage
What is the purpose of drainage at a summer cottage?
Before you begin to draw up a plan of work, you should decide what the idea is about arranging a drainage system on the site with your own hands. A drainage system equipped at a summer cottage should provide:
- removal of excess moisture from the foundation and basement. The appearance of dampness in the basement is accompanied by the formation of mold and fungi, and the combined effects of atmospheric precipitation and soil salts can destroy building structures. It is not excluded the appearance of cracks falling apart walls, distortion of window and door openings;
- in combination with anti-storm sewage protection of the foundations of buildings and the territories adjacent to them;
- sewer system protection. The contents of the septic tank will not rise to the surface when the groundwater level rises;
- soil protection against waterlogging. This will avoid decay of the root system of country vegetation, providing conditions for its growth and normal development;
- in the presence of a significant slope, prevention of erosion of the upper, most fertile soil layer, redirecting water flows formed during heavy rains into the drainage system in the area. Prevention of water erosion on the territory of the suburban area is a perfectly acceptable goal for conducting drainage in the suburban area with your own hands;
- prevention of deformation of artificial ponds and pools that may go into the soil;
- removal of excess moisture from the country fence, for the construction of which a strip foundation was used;
- the absence of puddles that constantly occur after rains and make it difficult to use garden paths, lawns and recreational areas.

The removal of excess moisture creates comfortable conditions for growing plants and prevents premature destruction of the foundation of buildings
When you have to do the drainage of the cottage
There are situations when there is no other way out, how to do the drainage of the site yourself. Drainage becomes compulsory if:
- the annual rainfall is quite high, and the summer cottage has a flat surface;
- the situation becomes even worse when the summer cottage is located in a lowland, where moisture will flow from all above the surrounding area;
- basements, cellars and foundations are being flooded;
- there is a strong slope, in which rapidly draining water erodes the topsoil, destroying humus, the best part of the soil;
- the site is heavy soils, loam or clay. They slowly pass water through themselves, causing the formation of puddles with stagnant water, attracting harmful insects and becoming a breeding ground for harmful bacteria multiplying;
- heaving of soil is manifested;
- groundwater rises to the surface at a distance of less than one meter;
- the foundations of the buildings are excessively deep, subject to seasonal floods;
- watering of lawns is carried out by an automatic system, and in the summer cottage a considerable part of the area was under artificial coverings that did not allow moisture to pass (under paving slabs, for example).
It's important to know! The absence of a drainage system for any of the listed factors is fraught with overmoistening of the soil and the following unpleasant consequences for the roots of trees, shrubs and other vegetation.
How to determine the need for drainage on the site with your own hands
It is easy to determine whether a drainage system is needed at the stage preceding the start of construction, when:
- conduct topographic survey;
- make up the characteristics of the soil;
- determine the position of groundwater.

TOgraphic survey is one of the measures that make it possible to identify the need for drainage in the territory
Conducting geodetic surveys ends with the preparation of recommendations related, including, to drainage. By acquiring a cottage that has already been operated, it is also possible to request geodetic surveys. You can get the necessary information without involving specialists, which will cost a decent amount. You can find out (or guess) about the waterlogged territory as follows:
- by asking former owners about their actions to counter flooding;
- by conducting a surface inspection of basements and cellars, where the presence of dampness will immediately appear;
- chatting with homeowners in the neighborhood;
- paying attention to the water level in nearby wells and boreholes. It is nice to do this during flood seasons;
- consider what constitutes a plant world growing on the area of interest. The rapid growth of bright vegetation in the dry season is evidence of the close occurrence of surface waters. Faced with nettles, reeds, sedge, cattail, you can be absolutely sure that the groundwater lies no deeper than two to three meters;
- seeing puddles with stagnant water;
- resorting to a tried and tested folk method when using an egg and a shred of wool, placed under a clay pot in a shallow pit. If both objects are covered with dew, then the water layer lies near the surface;
- after conducting trial drilling. With the help of a garden drill, as soon as the snow falls and the water level becomes the highest, a well is made, a depth of half a meter below the foundation level. The appearance of water in it within a day or two is a sure sign of the need for drainage.

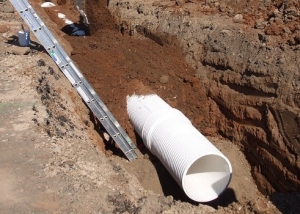
The drainage system is laid in undisturbed soil, and trenches dig in those places where there are no buildings
Some requirements of regulatory documents for the drainage of the site with your own hands
Codes of rules 31-105-2002 and 50-101-2004 regulate the most pressing problems that arise when arranging the drainage of a certain territory in the development zone. We highlight some of them:
- the groundwater level should be lower than the extent of utilities and basement floors by more than half a meter;
- drainage trenches are laid in the territory, free from buildings;
- pipes are laid on undisturbed soil or carefully rammed;
- the effectiveness of tubular drainage is manifested, as a rule, with a coefficient of soil filtration exceeding two meters per day;
- choosing a drainage system, proceed from the causes leading to flooding;
- calculations for drainage consist of filtration, hydraulic and selection of sand and gravel sprinkling;
- the system should be calculated sufficiently strong and capable of both capturing and passing the incoming water mass;
- the longitudinal slope is set at a level that excludes siltation of pipes (in clay soils - from 20 mm, in sandy soils - from 30 mm per linear meter);
- laying is carried out in dry (drained) soil and below the line of calculated freezing of the soil;
- tubular drains are sprinkled with draining materials (crushed stone, sand, geocomposites, etc.). The composition of the soil and the type of filter determines the choice of sprinkling composition, number of layers, layer thickness.
The choice of drainage system
To make a decision on how to do the drainage on a summer cottage with your own hands, you need to have a clear idea of the nature of flooding, it depends on seasonal floods and precipitation or is caused by a close occurrence from the surface of the groundwater. Before you begin the direct work, it is important to determine the type of system being equipped.

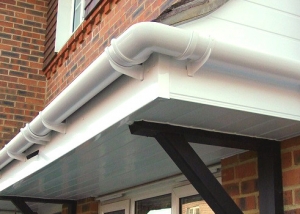
The local drainage system is laid shallow, and the water collection points are located in any particular place, for example, under a drain
Do-it-yourself surface drainage of the site is usually carried out in order to divert water that accumulates when precipitation occurs, snow melts or the car is washed. Its arrangement is mandatory in places such as the area around the buildings, and is carried out in such ways:
- Local (point). Water is collected in one place, in front of a door, a gate, next to a tap, etc.
- Linear. Water is removed from a large area in an open or closed way. An open method involves digging trenches with walls at an angle of 30º for unhindered water flow and carrying out crushed stone dumping. It prevents the destruction of the walls of the trenches and gives an aesthetic appearance to the structure. The closed method is used using trays and channels going downhill. The system is supplemented by the installation of sand traps and protective grilles. The base is made of concrete, and all the elements are mainly selected made of various types of plastic - PVC, PP, PE (HDPE). Additions to linear drainage can be point.
Deep drainage is carried out to reduce soil moisture. If you just need to remove excess moisture from the root systems of plants, then you can do without complex calculations of the depth of the laying. As a general rule, it will be:
- 600 mm - for a lawn or flowerbed;
- 900 mm - for forest trees;
- 1500 mm - for the orchard;
- 1000-1600 mm - for peat soils prone to subsidence.
Conducting deep drainage will require the use of perforated drainage pipes and the arrangement of wells:
- rotary - for audits, rinses and cleanings;
- water intake, equipped when it is impossible to divert water outside the cottage or in depth;
- absorbing, the device of which is resorted to with good absorbency of the lower layers of the soil, if it is not possible to divert water outside the cottage.
Important! Deep drainage is the hardest of all to carry out and the most expensive.

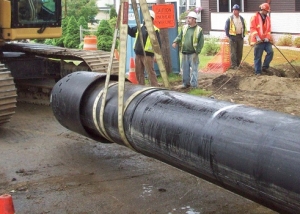
For linear drainage, trenches are required, the depth of which can reach 1600 mm
Designing and conducting surface linear drainage
The system of surface linear drainage consists of shallow trenches passing along the perimeter of sections and places of greatest congestion. The project necessarily provides for the main trench, accumulating water collected in the ditches. The end of the main trench is the water intake, which is used as a storm sewer or reservoir, a pit (ravine) outside the suburban area.The project provides for laying trenches to the main drainage system from all places where water stagnates.
When choosing an open arrangement method, sprinkling with crushed stone, when larger fractions are stacked at the bottom, will lead to a significant reduction in the throughput of the system. It is possible to use the so-called “fashional drainage” in order to save crushed stone and achieve a decorative effect. In this case, crossed stakes (goats) are installed in the bottom of the ditches, and bundles of dry branches 250-300 mm thick with the butt up are laid on them.
Closed linear drainage is carried out in several stages:
- At the design stage, the arrangement of sand traps and storm water inlets (or the connection of the sewer pipeline directly to the trays) is provided.
- The sod is cut and soil is selected to a width exceeding 200 mm the dimensions of the installed elements, and to a depth that takes into account 100 mm on a concrete base and backfill with crushed stone. Cleansing the base, tamping the soil and filling the gravel. Marks up the installation level of the trays.
- An approximate laying of elements and holes in them is done to connect sewer pipes. On the outermost trays, it is necessary to install with the sealant, always offered when selling trays, end caps.
- A concrete base is equipped, a sand trap is placed on it. The exposure of trays and sand traps is carried out so that the plane of the installed grate is 3-5 mm from the surface. Then the water will pass unhindered, and the car wheels will not damage the grille. The installed sand trap is fixed laterally with a concrete heel.
- On a flat surface that does not have a slope, it is possible to install the trays in a cascade at different depths. Trays, in order to avoid deformation by concrete, are mounted with gratings wrapped in plastic film to prevent contamination. The joints after installing the trays are smeared with sealant.
- Upon completion of the installation of all elements, a concrete heel is formed. When restoring previously removed paving slabs (pavers), it is necessary to preserve the expansion joint that separates it from the trays. You can run it with rubber cords or using a double-folded strip of roofing material with sealant.
- When the concrete sets (it will take 2-3 days), the excavated soil is poured back. Tamping the soil on top, lay the sod 50-70 mm higher than the surface of the lawn, taking into account further subsidence.
- After flushing the system and checking its performance, grates are closed by storm water inlets and sand traps. Before the expiration of a week and a half, do not expose the system to vertical loads.

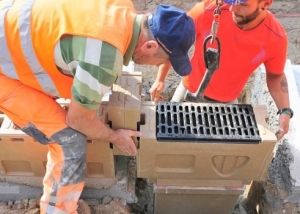
The system of deep drainage uses metal or polymer gratings with which water inlets are closed
Designing and conducting deep drainage
The implementation of the project of deep drainage is associated with much greater difficulties. In order to avoid mistakes that will result in the proximity of dry places to waterlogged, it is recommended that a specialist be involved in the design process.
The project should display the diameter and location of the drainage pipes, their depth, the main trench in the section going to the water intake, the placement of the inspection and other wells.
Installation of the system can be reduced to three stages:
- Arrangement of trenches. They are laid 400 mm wide, and the depth for loams and clay soils is recommended to be made equal to 600-800 mm, for sandy ones - 800-1200 mm. After checking the presence of a slope, pour a layer of sand, moisten and tamp manually. The bottom is lined with a fixed geotextile fabric, with approach to the side walls.
- Installation of wells. Having measured the position of the wells and noting the places where the couplings will crash, remove them, cut the couplings and install the bottoms. Having installed the wells, they fill and compact the layer of rubble or gravel.Sections of drainage pipes with a diameter of 110 mm of the required length, equipped with plugs as necessary, and a trunk (collector) pipe with a diameter of 160 mm are laid in trenches. By connecting to the wells couplings, a check is made of the depth and slope.
- Backfill. Having thrown a layer of 200 mm gravel or gravel, tamp it and cover it with a geotextile cloth previously attached in trenches. When checking operability, a large volume of water is poured at the place of laying the drainage pipes, they control how absorption into the crushed stone layer and flow through the wells and into the water intake take place. After checking, fill the geotextile with sand with a layer of 200 mm and tamp it. Fertile soil is applied over the sand. Wells are covered with lids.
Conducting surface drainage at a summer cottage may well be done on its own. But undertaking to independently carry out deep drainage, without involving specialists for help, is cautious. The arrangement of deep drainage is a troublesome, costly and requires special training.