When repairing an existing pipeline or laying a new one, the question “how to connect the components” arises very often. This question is really important, since an unreliable connection can eventually lead to malfunctions, or even a serious accident. In many cases, a pipe coupling can serve as a reliable docking element. From this article you will learn how to independently choose this product based on the characteristics of the pipeline.

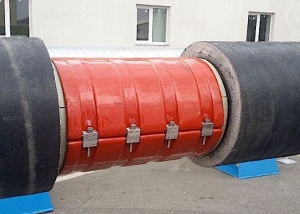
Installation of pipelines is carried out using different types of couplings, which are selected according to the size and type of pipes
Content
What is a coupling
Couplings for connecting pipes most often look like a small cylinder in which the ends of pipes that need to be connected are fixed in a certain way. The installation method depends on the specifics of the fitting. Couplings can be used both for simple connection of two segments of the pipeline, and as an adapter. Using special types of these fittings, it is possible to connect the components of the trunk from different materials or different diameters. If you follow the instructions during installation, the couplings can provide high reliability of the joints of the pipeline.
Coupling Benefits
Couplings have the following advantages:
- low price;
- relatively quick and easy installation in most cases;
- durability;
- reliability;
- availability and wide assortment;
- the ability to quickly disassemble the structure (subject to a threaded connection).
Types of couplings
The fittings we consider are available for the following varieties of pipes:
- metal-polymer;
- polypropylene;
- polyethylene;
- plastic;
- cast iron, copper;
- steel.

A wide range of couplings is available for each type of pipe.
Important! When installing the fitting, it is strongly recommended that you select a sleeve whose material matches the material of the pipeline. When installing a coupling made of another material, the reliability of the joint can be significantly reduced.
Metal-polymer coupling
In the case of metal-polymer pipelines, pipe couplings are not particularly common fittings due to their uselessness. They are designed to connect short elements of the future network. Pipes from such material rarely need additional connections, since most often blanks of the required length are immediately purchased.
However, a fitting of the “adapter” type, which connects the metal-plastic pipe to the valve or steel pipe, may be useful. If you change the water supply in the house to metal-polymer, then just such a coupling will provide a connection to the valves.
Mounting Features
Follow these steps to install this product.
- Sealing. The external threads should be wrapped clockwise with linen. It is advisable to soak flax itself either with drying oil, or with lead minium. But, if these substances are not at hand, you can use any paint.
- Carefully, without applying a lot of force, you need to screw the adapter onto a previously sealed external thread. It is recommended to use an adjustable wrench for this, so as not to scratch the material.
- Put the union nut on the pipe and then the split ring. You should also chamfer the inside of the pipe.
- Throw the pipe over the coupling fitting. Then two keys are used. The first fitting is held in a stable position, the second - the union nut is tightened. In this step, you should also be careful not to slide the seals.

Metal-polymer coupling allows you to quickly and easily connect metal and metal-plastic pipes
If you still need to connect two sections of the metal-plastic pipeline with a conventional pipe coupling, installation should be carried out in the same way. The only difference in thread difference.
The dimensions of such fittings are selected accordingly with the dimensions of the pipe. So, the most commonly used sizes are 16, 20, 26 and 32 mm.
Polypropylene couplings
Fittings for this kind of piping are a very simple design. This is just a piece of thick-walled pipe, which has a diameter slightly larger than the diameter of the connected pipe. At the same time, the pipe in the coupling should not “walk”; on the contrary, a certain force must be applied to insert it into the coupling.
Installation
Installation is as follows:
- First of all, it is necessary to remove the chamfers: external from the pipe and internal from the coupling.
- If possible, you should set the temperature on the soldering iron to about 270 degrees. Next, you need to install the nozzle, which corresponds to the diameters of the alloyed products.
- If the pipe has aluminum reinforcement, then it must be cleaned.
- Next, fit the fitting onto the narrow part of the nozzle and insert the pipe into the wide one. You need to hold them for 5-10 seconds. It is not recommended to press on the parts during soldering and keep them on the soldering iron longer.
- At the end, remove the parts from the soldering iron and insert the pipe into the sleeve.
Important! Insert the pipe directly without turning it. Otherwise, waves can form on the surface, which can greatly reduce the reliability of the connection.

The polypropylene coupling is mounted on the pipe end melted with a special soldering iron
Polyethylene couplings
Fittings for polyethylene pipelines are divided into the following varieties:
- compression;
- electric;
- protective.
Each of the types implies its own installation method.
Compression fittings for pipelines can combine pipes of the same diameter or different. In addition, there are special fittings that have internal or external threads for connection to steel pipes, valves or other products that have threads. Thus, this type of connector is universal.
Installation in this case is quite simple.
- First, the fitting itself is partially disassembled, the union nut is loosened by half a turn.
- The pipe is cleaned of dust, the outer chamfer is cut with a knife or chamfer.
- The pipe indicates the depth at which it should enter the fitting.
- Insert the pipe into the sleeve to the mark.
- Tighten the tension nut fully.
Although the nut must be fully tightened, excessive force must not be applied during this process. Otherwise, the connector may be damaged.
Helpful advice! In order to better fit the pipe into the coupling, it is recommended to lubricate it with liquid soap.

Electric couplings are used to connect polyethylene pipes
An electrofusion coupling is a connector within which a heating element is located. Installation in this case is also quite simple. It is only necessary to have a power source - a special apparatus.
Installation is carried out in this way:
- Clean the pipe from dust and remove the top layer of polyethylene at the installation site.
- Install the connector on the pipe.
- Apply power to the terminals of the fitting.
- At the end of heating, disconnect the wires.
- Leave the structure for 20 minutes.
Thanks to the heating element, the polyethylene components melt.After turning off the power, they freeze and form an almost monolithic and very reliable connection.
Protective couplings are used when laying a pipeline through reinforced concrete walls. Constant contact with reinforced concrete can adversely affect polyethylene, so it is recommended to use such protection. The coupling is a one-piece ring that is installed in the wall. Through this ring and should be a pipeline. Having established such protection, you can not worry about the effect of reinforced concrete on polyethylene.
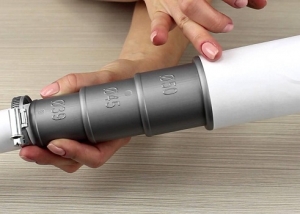
Plastic couplings
Plastic couplings are very easy to install. They are a cylinder with two seals, it is sometimes also called "connecting pipe". For installation, you just need to remove the external chamfers from the pipes and connect them to the fitting.

Plastic couplings are very easy to use; they fit onto pipes without tools
Helpful advice! If for some reason it seems to you that the connection is not reliable enough, you can walk along the seams with a sealant.
Cast iron and copper couplings
There are special fittings for connecting this type of pipeline, but installation in this case is quite complicated. Firstly, it is necessary to be able to get to the pipe on each side, otherwise it is unrealistic to ensure the tightness of the joint. If the pipeline is laid near the wall, you will have to hollow part of it near the junction. Secondly, all work needs to be done very carefully and with concentration. It is highly advisable that an experienced person is involved in the installation, since such work may not be possible for a beginner.
Installation is as follows.
- First, the joint is sealed with a heel.
- The pipe is inserted into the fitting until it stops. This is necessary so that the seal does not fail.
- Hammered kabalka. This must be done in several revolutions and minted every revolution around the entire circumference.
- After minting, it is necessary to cover the joint with a cement mortar.
You can mint with a simple screwdriver.
Important! Do not neglect the chasing of the seal. If we restrict ourselves to cement mortar, the connection will not last long. After a while, it may leak.
Steel couplings
Steel couplings are very popular. They can be used both to connect the components of the pipeline, and to eliminate fistulas, cracks and other similar damage.

Steel couplings can be used not only for the installation of the pipeline, but also for its repair
These products are divided into two types: threaded and compression.
Threaded fittings
Threaded connectors are the simplest threaded cylinder. Using this thread, the components of the pipeline are fixed. The fitting provides high reliability, and during installation you can not be afraid to damage the product - it is quite resistant to mechanical stress. Such parts have one minus - if they are used on a cold water supply system, over time, under the influence of condensate, the threads stick to each other, which will greatly complicate possible disassembly in the future. To avoid such consequences, fittings are made of cast iron or brass - they are not exposed to such phenomena. Installation is simple - simply screw two sections of pipe into the thread of the connector.
It happens that when installing and disassembling it is not possible to rotate the pipe. In this case, special couplings with a drive are used.
Installation of such connections is carried out in the following steps.
- The locknut and coupling must be screwed onto the long threads of the drive.
- Screw the short thread into the coupling valve, another fitting, etc. Wrap the connection with flax.
- Next, you should wind the external thread of the pipe from the side of the long thread of the run.
- It is necessary to drive the coupling onto the pipe along the long thread of the drive.
- Following the clutch, the locknut is driven. Here, it is also necessary to wrap the connection with flax.
Thus, a reliable and durable connection of the steel pipe is obtained.
Compression fittings
Such connectors are a universal solution in cases where there is no thread on the pipe, or it has rotted, or it is impractical to cut it. When properly installed, such fittings will ensure high tightness of the connection.

Compression type couplings are installed in cases where it is not possible to use a threaded fitting
As with other couplings for connecting pipes, there are many types of compression parts, which allows you to use the fitting as an adapter from one diameter or material to another. In addition, compression steel connectors can be threaded on one side to connect valves, threaded pipes, etc.
Such fittings are also often called Gebo.
Installation in this case is fast enough. Another advantage of such products - the connection is easy to disassemble at any time.
They are installed like this.
- The thread must be cut from the pipe (for cases when the thread has deteriorated and you cannot use the threaded fitting).
- To clean a section of a pipe in a place of supposed connection from paint and other.
- Then fitting parts are put on in the following order: union nut (on the pipe), compression ring (cone to the nut), metal clamping ring, rubber ring (cone on the nut), coupling body (on the pipe). Do not push the pipe into the fitting until it stops, it is better to leave a small margin of about 5 mm.
- Tighten union nut. Keep the connector housing with one key and tighten the nut with the second.
After installation, check whether the joint is leaking. If this happened, it means that the surface was poorly cleaned and there is no tightness in this joint.
Such joints are very useful in the repair of old pipelines. The fact is that welding can be a short-lived solution: as a result of welding, a malfunction may appear in another place.
Helpful advice! Most of the compounds examined by us can be used several times (except for polypropylene and electric polyethylene). When dismantling, do not rush to throw them away - they may still come in handy. However, be sure to replace the rubber seal, if any. When re-installing it, the reliability of the connection is not guaranteed.
Thus, the pipe coupling is a versatile and very convenient means for connecting all types of pipes and creating a variety of transitions to other diameters or materials.