Connecting a heated towel rail is an absolutely necessary condition for a full bathroom equipment. A plumbing product not only performs the functions arising from its name. Thanks to its presence in the bathroom, the optimum temperature and sanitary conditions are maintained, excessive humidity is eliminated, leading to the appearance of unpleasant odors, mold on the walls.

You can connect a heated towel rail of any model and type with your own hands
Content
Towel dryer classification
Products are distinguished by several basic parameters. By type of heating, they can be:
- water. Connection is made either to the heating system (imported samples), or to hot water supply, or to a double-circuit boiler;
- electric. They do not require a connection to the water supply system, therefore they function independently of the disconnection of the heating system or hot water in the summer. Some models work similarly to oil heaters. The double protection system, upon reaching the specified heating or software failure, disconnects the device from the mains;
- combined. In case of interruptions in the operation of the hot water system, it is possible to connect to the electric network.
For the manufacture of heated towel rails, various metals and alloys are used:
- stainless steel. This is the most common material for the manufacture of these sanitary products. Surfaces can be stained or chrome plated, coated with imitation brass or bronze. With a wall thickness of an inch diameter pipe from 3 mm, the device is able to independently provide heating for the bathroom in a standard apartment;
- black steel. If there is no internal anti-corrosion coating, it is recommended to install heated towel rails made of such material only in autonomous heating systems, where the effects of high pressure and its drops are excluded;
- copper. Devices are distinguished by aesthetic appeal, low weight, ease of assembly, quick heating and resistance to corrosion. When connected to a hot water supply system, galvanization of copper pipes from the inside is provided;
- brass. Imported brass dryers are mainly not designed to be connected to a centralized hot water supply, which is characterized by pressure drops.

The electric heated towel rail is convenient in that it can be placed anywhere in the apartment, regardless of the location of the water pipes
Note! The presence of an internal chrome coating in some models extends the life of the device.
There are differences in connection methods, which can be:
- lateral (left or right). The lateral connection method provided in the device allows installation to be made anywhere, therefore it is considered as optimal and most practical;
- top;
- lower;
- with angled water supply.
Based on the installation site, heated towel rails produce:
- outdoor.Models are produced, which are a combination with a heating radiator mounted on a wall without window openings. In the combined bathroom, the floor device can be used as a dividing wall, additionally heating the room. Due to the mobility of the electric outdoor appliance, the structure can, if necessary, move to any room;
- wall. The mass popularity of wall devices is due to their compactness, which allows installation in a place where they do not clutter the cramped space, and a variety of shapes and sizes.
By type of construction location:
- vertical. Performed by a "ladder";
- horizontal. Performed as a coil.

Models in the form of a ladder are the most popular, as they fit almost any interior
By the features of fixing parts of the structure:
- stationary. More reliable and durable products can be supplemented by a removable rotary mechanism that is not connected to the water supply;
- rotary. Using a special mechanism, the rotation of individual elements is carried out at an angle of up to 180º. Design stability does not suffer. The weak point of the water swivel heated towel rail is rubber seals, the wear of which leads to leakage.
Note! Models of heated towel rails differ depending on the distance between the centers of water supply. It can be 300, 350, 450, 500, 600 and 800 mm.
The variety of forms constantly invented by designers is impressive. The most popular are:
- "Snake";
- "Ladder". It can be supplemented with an integrated shelf;
- E-shaped;
- M-shaped;
- U-shaped.
The release of heated towel rails is arranged in several styles, which vary significantly in cost:
- premium. Designed for a stylish finish of the bathroom, emphasize its sophistication and luxury;
- Suite Classic style with nickel-plated sheen;
- retro. Create an antique setting, emphasized by the use of a bronze or brass coating;
- ECO. Look organically in the interior of the bathroom, being painted in pastel colors.

There are models made in different colors and shades - they can complement and decorate the interior of the bathroom
What is required to connect a heated towel rail
In case of purchasing a heated towel rail, the connection will require:
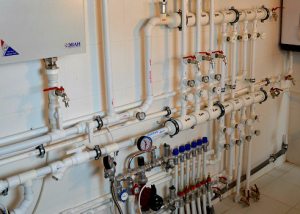
- the presence of a hot water circulation system, including supply and return pipelines;
- ball valves for shutting off water;
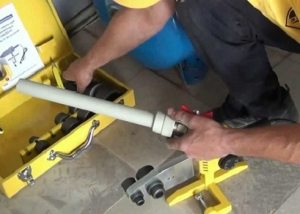
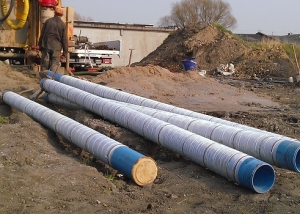
- polypropylene pipelines, as well as fittings;
- plugs;
- air outlet valve;
- brackets for fixing the device at the installation site;
- tools for working with polypropylene elements. It will be enough to use a knife and a welding machine.
Of course, the list of tools will have to be significantly expanded if you first need to dismantle the old-style heated towel rail installed in the apartment of a multi-storey building. Then a side heated towel rail will have to be installed together with a new riser, and replacement should be coordinated with neighbors living in apartments through which the riser passes. Partial replacement of an old pipe can cause a lot of problems, so it is better to completely replace it. Dismantling of the old heated towel rail and riser is carried out after the water is shut off by the service organization using a grinder. Further, pipes are cut on the pipes of the upper and lower floors with respect to the bathroom of the floor. Pipes connect and get into the bathroom. It is recommended to immediately acquire a bypass (bypass) that acts as a jumper, for which it will be necessary to install ball valves at the ends of the heated towel rail. Installing a bypass allows you to solve several important problems at once:
- to maintain at the proper level the speed at which water of 60-degree temperature evenly circulates along the riser;
- provide the ability to connect several heated towel rails to one riser throughout its length;
- adjust the temperature of the heated towel rail (using an additional control valve) or completely turn it off if necessary, without the need for a service organization and without affecting the situation in other apartments.

The method of installation and connection of the heated towel rail to the water supply depends on the device model
Features of installing a side heated towel rail
Domestic heated towel rails are designed to be connected to hot water supply systems, as required by SNiP 2-04-01-85. Most imported models are required to be connected to the heating system. This feature should definitely be paid attention to when buying a device and, especially, during installation. When installing a heated towel rail in a private house, this circumstance can be ignored.
Experts give the following tips on how to connect a water heated towel rail:
- in order to avoid significant heat loss, the installed device must be separated from the riser no further than two meters;
- center distance is not more than 500 mm;
- the use of metal-plastic pipes, which do not withstand pressure drops, is not desirable;
- the supply pipe is installed with a slope of the order of 5-10 mm in the direction of the water flow;
- from the surface of the walls of the pipe, the pipes should be more than 35-50 mm apart, depending on the diameter;
- if parts of any material can be connected to a plastic pipe, then the connection of other materials in one system is undesirable due to the possibility of electrolytic corrosion;
- it is unacceptable to use pipes in the heated towel rail, the diameter of which is smaller than in the system, otherwise a pressure surge will lead to an accident;
- the use of "American women" connecting the device to the riser will make it easy to remove the device;
- the use of bypass and ball valves is highly desirable;
- joints must be sealed using a winding made of linen (for metric threads) and FUM tape (for tapered threads);
- locking devices on the heated towel rail connected as part of the riser are not installed.

In places where the device is attached to the pipes, cranes are installed that make it possible to remove the dryer without shutting off water in the entire apartment
How can a connection be made?
When the side and diagonal connection is selected, the coolant is supplied, as a rule, to the upper part with an unrestricted and unbiased bypass, and it is produced from the bottom. When connecting, note that:
- heated towel rail is located between the upper and lower branches of the riser;
- a slope of 3-4 mm per linear meter is required;
- to ensure circulation, pipes are selected with a diameter of 32 mm, and for ball valves - from ¾ inch. Installing elements with a smaller diameter is allowed in cases where the length of the supply pipes is small and the height of the connected device is sufficient to cause an effect called the "gravity pump". (When the water cooled in the heated towel rail, due to its higher density, rushes down, returning to the riser, and the vacated volume is filled with a coolant of a higher temperature coming from above from the riser);
- polypropylene supply pipes should be covered with thermal insulation (if it is planned to install them in the walls, then this is considered mandatory). Thermal insulation improves the circulation of the coolant.
The implementation of the connection in this way is considered universal, allowing to achieve such advantages:
- operability will remain regardless of the direction in which the feed in the riser;
- the circulation rate of the coolant in the riser does not matter;
- when you turn off the hot water supply, you do not have to bleed air from the heated towel rail;
- the device can be installed at a sufficiently large distance from the riser, reaching four and a half meters, provided that polypropylene pipes with a diameter of at least 25 mm are used.

Often a heated towel rail is located next to the DHW riser, but with the help of pipes you can install it and away from the main pipe
Important! With a lower connection, it is assumed that its point will be above the upper outlet of the riser, so that the heated towel rail works regardless of the direction of supply, and the lower outlet of the riser is below the dryer.
With the lower connection, the following advantages are achieved:
- it works no matter how the feed is sent;
- pipes can be placed covertly, for example, under a bathtub, and wall shredding is not needed.
The disadvantages when choosing this method are quite significant:
- operational efficiency is slightly lower than when using side or diagonal connection;
- installation of Maevsky cranes is required to bleed air.
The use of side and diagonal connection when narrowing or shifting the bypass is considered the most correct way, guaranteed to ensure the operation of the heated towel rail. The supply should go only from above, since with poor circulation and narrowing of the bypass, the efficiency of the device will sharply decrease.
How to install and connect a heated towel rail
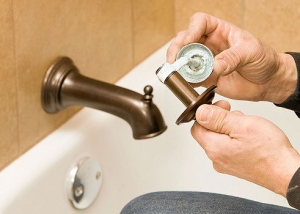
Before proceeding with the installation of a new plumbing fixture, you will need to disassemble the old design. You will have to contact your service organization to turn off the hot water supply. The old structure could join the riser:
- threaded connection (if it is in good condition, then you can just unwind, if it is attached - use the grinder);
- welded joint (you need to use a grinder, leaving a sufficient remainder of the pipe for threading under the fittings).
Having removed the disassembled old design, proceed:
- Bypass creation
- to install ball valves and inlets.

When tightening the nuts, do not be too zealous so as not to break the threads
On this, the preparatory measures can be considered completed and proceed directly to the installation and connection:
- Choose reflectors in the form of decorative cups covering the joint and fittings, on the threaded surface of which stick the FUM tape (or use tow instead). FUM tape rolled up towards the thread runoff when fitting is installed will be pressed against the wall surface and will act as a kind of sealant.
- Putting on the fitting a decorative reflector, with a certain effort, but carefully so as not to break the thread, twist it, attaching to the internal thread of the pipe connected to the bends for the device to be installed.
- Similarly, prepare and tighten the second fitting, which is connected to the outlet from the riser.
- After connecting the fittings, install inside the o-rings, rubber or polyurethane.
- Check how the heated towel rail will be installed by attaching it to the installed fittings and the wall and making some bait. After checking the correct distance between the fitting, mark with a marker or pencil on the surface of the wall the points for making holes for holders (brackets).
- When making holes in the ceramic tile, so that the drill drill does not slip, tilt the desired point using a self-tapping screw and a hammer. Instead of sticking, you can use another method - stick a band-aid (cross-wise) or a tape of paper tape at the place of the future hole. Then on the tile there will definitely not be cracks and chips.
- Make a hole in the ceramic tile at low revolutions of the drill, preferably using a special lance-shaped drill designed specifically for such operations, and after reaching concrete, go to high revolutions.
- Insert dowels so that the edges do not come out of the holes (cut off the excess with a knife) to ensure a tight fit of the holder (bracket).
- Squeeze the heated towel rail onto the fittings and secure by tightening the nuts by hand. With a plumbing wrench, no more than two revolutions are made, with a rag, a nickel-plated surface is protected so as not to scratch.
- Move the decorative reflectors away from the wall, rotate the taps, letting the water into the heated towel rail.
- After making sure that the joints are tight, screw the screws into the prepared holes. Check the strength of the installed structure.
A properly connected heated towel rail will last long enough and will not require repair or maintenance.