An increasing number of our compatriots for plumbing work prefer polypropylene pipes. Ease of use, low cost and operational performance of this material - all this led to a high demand for these products. According to manufacturers, they will serve for at least 50 years. And in order to carry out the laying of polypropylene pipes with your own hands, it is enough to have only initial skills in this field.

It is possible to lay a water pipe from polypropylene pipes both in an apartment and in a private house
Content
PP pipe benefits
As is known, polypropylene (granules or light powder) is a product of the propylene polymerization reaction carried out using metal catalysts. To obtain pipe products, the raw materials are first melted, and then the pipes themselves are formed by extrusion.
At a temperature of 170 ° C, the polypropylene melts, and at 140 ° C it softens. This property determines the suitability of pipes made from it for creating heating systems, as well as hot and cold water supply. But arrangement of steam pipelines based on them is not allowed.
Polypropylene water pipes resistant to the destructive effect of the corrosion process, so they can:
- mount in rooms with a high degree of humidity;
- use in aggressive environments;
- to lay underground in places where an elevated level of groundwater is recorded.
Helpful advice! Do-it-yourself laying of the polypropylene pipeline is recommended with the condition of the maximum possible protection against direct sunlight.
Although such a material is perhaps the lightest plastic, it is characterized by high wear resistance. From this it follows that polypropylene water pipes tolerate the abrasive effects of sand and exfoliated rust quite well, the penetration of which into the water supply system does not even guarantee the use of filters.

Polypropylene pipes are durable and corrosion resistant.
The strength of these products is less than that of steel counterparts. Therefore, when laying a pipeline from polypropylene with your own hands, as well as during operation, pay special attention to its protection from possible mechanical damage.
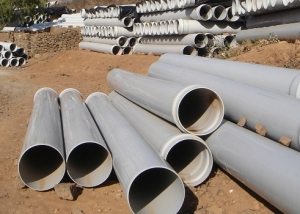
Product Specifications
The main characteristics of tubular products are diameter and wall thickness. Their classification by these parameters allows us to perform calculations to ensure high-quality liquid transportation. Having studied the table below, you can find out the variety of sizes of polypropylene pipes present on the modern market.
| External diameter | Wall thickness PN25 | Wall Thickness PN20 | Wall thickness PN16 | Wall Thickness PN10 |
| 110 | 18,40 | 18,40 | 15,10 | 10,0 |
| 90 | 15,0 | 15,0 | 12,30 | 8,20 |
| 75 | 12,50 | 12,50 | 10,30 | 6,90 |
| 63 | 10,50 | 10,50 | 8,40 | 5,80 |
| 50 | 8,40 | 8,40 | 6,90 | 4,60 |
| 40 | 6,70 | 6,70 | 5,50 | 3,70 |
| 32 | 5,40 | 5,40 | 4,40 | 3,0 |
| 25 | 4,20 | 4,20 | 3,50 | 2,3 |
| 20 | 3,40 | 3,40 | 2,80 | 1,90 |
| 16 | 2,70 | 2,7 | ________ | ________ |
Pipes in the PN20 category are universal products. The PN10 group includes thin-walled products for underfloor heating and cold water systems. PN16 pipes are used in cold water supply and heating systems, characterized by low heat carrier pressure. Products of category PN25 are reinforced with a layer of aluminum foil and can be installed in central heating pipelines. Some manufacturers mark PN10 pipes with a blue longitudinal stripe, and PN20 with a red stripe.

Thin-walled PP pipes are used for underfloor heating
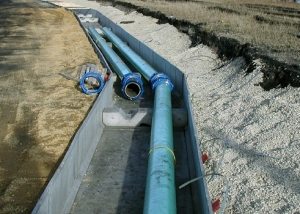
The long term of operation allows the use of polypropylene water pipes for any type of installation:
- hidden - in the supporting structures of the structure and underground;
- open - on the surface of the earth, on the floor or on the wall of the premises;
- channel-free pipe laying in the ground;
- laying in mines;
- laying in boxes.
But work is necessary in compliance with regulatory requirements. So, for example, if we talk about laying polypropylene pipes designed to transport water at elevated temperatures (from +45 degrees), then they should be placed on sliding mounts that provide the possibility of longitudinal displacement. However, their installation in boxes and channels is allowed.
Helpful advice! Polypropylene water pipes withstand bending, the value of which does not exceed 10% of the diameter. That is, in fact, they cannot be called flexible. Therefore, to lay a polypropylene pipe in the ground, in the wall or on the surface of the earth should be straight sections. And to implement the necessary bends, use the appropriate bends.
How to hide pipes in the wall
The desire of the owners to mount the pipeline in this way is quite justified. The interior of the kitchen, toilet and bathroom will benefit from this. However, this may raise questions about how the walled pipes will behave, and how, in fact, to perform installation.

To hide pipes in the wall, they make strobes in it
We immediately discard doubts: with the right approach to business, hidden communication will last a very long time. But only if the following requirements are met:
- the system should have a minimum number of connections, and best of all, if it is monolithic;
- in order not to interfere with the process of natural thermal expansion of propylene, laying a pipe for hot water yourself, leave a gap.
Without fail, cover the water supply with a layer of thermal insulation. For this, mineral wool, glass wool, corrugated cardboard or other insulation is suitable. So you protect the structure from unwanted fogging. In closed engineering communications, it is very important to provide for the possibility of unhindered access to valves (cranes). Usually, hatches or special doors are installed in these places.
Installation Technique
Drawing a marking is a preliminary stage of laying polypropylene pipes in the wall. You can use a simple pencil for this. Next, you must perform the following steps:
- Using a puncher (grinder), cut two parallel-running strobes (slots in the wall). When working with a grinder, it is recommended to use a simple stone disk or a disk with teeth that have undergone diamond processing.
- Remove material between the two markings with a chisel or puncher, thus combining them into one.
- Insert the water supply structure into the finished strobes, closing the pipes with cement mortar after that.
- The final stage of laying polypropylene pipes in the wall involves testing the operation of the newly created system. Filling it with water, make sure there are no leaks, sagging or other malfunctions in the water supply.
If leaks are not found, proceed to the finish. To do this, you can use plaster. However, the choice of facing material depends on the taste and level of well-being of the homeowner.

Having laid the pipes in the strobes, you need to fix them and conduct tests
You should be aware that strobing walls in panel houses is strictly prohibited. This is due to the relatively small thickness of the panels, and gating will lead to a decrease in their strength. Carrying out such work is permissible only in houses with thick brick walls.Therefore, in modern high-rise buildings, the laying of polypropylene pipes is carried out by attaching to the wall. Let us briefly dwell on this issue.
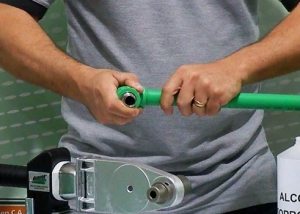
Installation of water pipes to the wall
Pre-connect segments of the future pipeline by electro-fitting or using a multifusion butt welding. Next, mark on the walls its path along the perimeter of the room.
Important! Install piping with a slight slope. Such a solution will exclude the possibility of freezing the liquid remaining in it even if the room is not heated. It is, first of all, about the cottage.
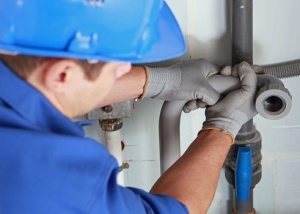
The sequence of steps for laying pipes with your own hands is as follows:
- Drill holes under the dowel-nails. This is done with a drill.
- Attach mounting clips to the wall.
- Securely fix these fasteners. To do this, insert dowels into the holes using a hammer and a screwdriver.
- Install the pipes and secure them with clips.
To bend polypropylene products without preheating is allowed at temperatures up to +15 degrees, and installation is recommended at a temperature not lower than +5 degrees.

Plastic clips are used to fix the pipes on the wall
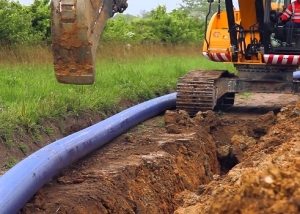
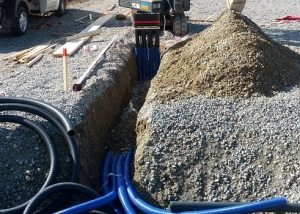
Laying in the ground
According to the requirements of GOST, diameter water pipes laid in the ground should be 32 mm and their length is 2.4 meters. For simple and quick installation, you must purchase fittings.
Do-it-yourself laying the polypropylene pipe in the ground in the following sequence:
- Dig a trench. The regulatory documents say that its depth should be below the level of soil freezing. For your region, a specific figure can be found in special tables. The optimum width of the moat is 0.5 meters.
- Seal the bottom and walls of the trench.
- Make a cushion pad by pouring 10 cm of sand.
- Wrap the pipes with a layer of thermal insulation, lay them in a ditch and connect them using fittings.
- Sprinkle utilities in the sand. The upper mark of its layer should be 5 cm higher than the outer surface of the pipeline.
- Place the passage of the water supply with tiles, tiles or broken brick.
- Fill the trench with the excavated soil.
And do not forget to create a well near the central highway to install shutoff valves in it. With it, you can emergency shut off the water, as well as connect additional objects to the water supply. The well is usually laid out of brick or made of reinforced concrete rings.