A properly equipped chimney in the bathhouse will provide not only long-term heat storage, but also the safety of visitors. Indeed, in the process of fuel combustion, along with water and carbon dioxide, soot is formed, which must be put somewhere. But that's not all! The main danger is the release of carbon monoxide, the inhalation of which can lead to the most serious consequences. To prevent this, home craftsmen build a chimney for the bath with their own hands.

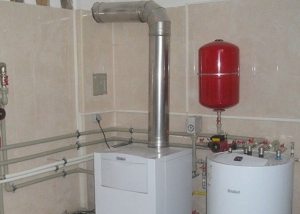
The correct installation of the chimney in the bathhouse is as important as in a residential building, so before construction you need to study all the subtleties of such work
Content
Chimney Choice
The main criterion for subdivision of flue systems into types is the material of their manufacture. As such, it is mainly used:
- brick;
- steel (metal) pipes;
- ceramic pipes.
It is allowed to use a combined version - for example, a steel pipe passes inside a brickwork or a ceramic pipe is framed by a steel casing. Due to the lack of other materials, brick was traditionally used for the manufacture of chimneys. However, today steel chimney systems are also widely used.
Among the time-proven advantages of a brick chimney include:
- it is significantly more durable and stronger than the metal analogue;
- more fire-safe;
- brick itself accumulates heat well, and is also characterized by excellent heat-insulating properties;
- profitability. For the manufacture of a chimney of this type, only brick, sand, cement and water are required:
- if the stove has a brick oven (and this is most often found), the best option is to create a chimney system from the same material.

For a brick oven, it makes sense to build a chimney from the same material
Of the main shortcomings, experts highlight:
- the complexity of the construction of brickwork. In the absence of skills to create from this material a chimney in the bathhouse with your own hands will not succeed;
- Due to the roughness of the inner surface of the brick chimney system, the passage of smoke is difficult due to soot accumulation. And its fire is not excluded. Therefore, a brick chimney requires regular cleaning;
- the heavy weight of the final structure necessitates the construction of a foundation.
Metal chimneys are made of stainless steel. Other materials will not withstand the effects of moisture and temperature changes constantly present in the bath. Flue systems of this type have the following advantages:
- simplicity of installation (installation);
- soot accumulates in them in smaller quantities. In addition, similar chimney designs are easier to clean;
- ready-made metal chimneys can be found on the domestic market for sale. And their cost is quite affordable to the wallet of our average compatriot. Therefore, the question of how to make a chimney in the bathhouse with your own hands is solved quite simply.

The most practical, durable and easy to install will be a metal chimney
The high thermal conductivity of the metal is the reason for the main drawback of the chimney system created from it: the pipe must be provided with reliable thermal insulation, especially in places where it passes through the ceiling, walls and roof of the bathhouse. In addition, so that smoke does not penetrate the bath, special attention should be paid to the tightness of the joints of the chimney pipe parts.
Today, designs of metal chimneys from sandwich pipes are very popular. Between their internal and external pipe elements is a layer of thermal insulation. In this case, the first should be steel, while the outer pipe can be made of any metal.
Good to know! Galvanized tubular products for the organization of the smoke exhaust system of the bath are not recommended. With temperature fluctuations, their diameter changes, as a result of which the tightness is broken and the strength of the structure is lost.
The advantages of brick and steel chimneys are most deeply combined in flue systems from ceramic pipes. The main advantages are formulated as follows:
- ease of installation of a ceramic chimney system. Clearly following the instructions, a chimney for a bath with your own hands can be created by anyone who has only initial skills in working with plumbing tools;
- as well as brick, ceramics has a low thermal conductivity. That is, heat is well accumulated without compromising fire safety.
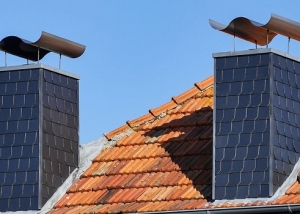
Another criterion on the basis of which the type of the chimney is selected - its location relative to the building: the internal ones completely pass inside the room, and the external ones - the pipe from the furnace immediately goes outside the bathhouse structure and the main part of the chimney is located outside.

The chimney can be internal or external, it depends on the type of furnace
In the latter case, installation is greatly simplified, which is very important when the owner plans to make a chimney in the bathhouse with his own hands. However, such a constructive solution requires additional thermal insulation. Otherwise, soot will accumulate in the pipe and condensation will form. In addition, this option increases fuel consumption. Indeed, in this case, the chimney “heats the atmosphere”.
The internal arrangement, among other things, is devoid of the last drawback. The heat of hot smoke can be used to heat the bath room.
Additional elements of the chimney
The most efficient way to cope with the solution of the task assigned to him is a direct chimney, without bends, coming from the furnace exactly up. Typically, brick flue systems are designed this way. However, such a configuration of ceramic and similar steel structures is not always feasible. Various obstacles can be encountered on the chimney path, for example, elements of the supporting structure through which it is impossible to pass the pipe.
But in any case, when arranging an external chimney system, bends cannot be avoided. Here, you first have to lead the chimney straight up, then, to bypass the obstacle, at an angle either horizontally, and then again vertically. In this case, it is necessary to be guided by the following rule: the total length of inclined and horizontal sections should not be more than 1 meter. Otherwise, the chimney will be difficult: from the course of high school physics it is known that hot gas does not tend to go sideways, but to rise. And one more minus of the non-vertical design - soot in large quantities accumulates precisely in horizontal areas. The number of turns of the chimney pipe must be minimized. As practice shows, you can always develop a project with one, maximum two turns.

When designing a chimney, everything needs to be calculated so that the finished structure has as few elbows as possible, soot accumulates quickly
Regardless of the location of the pipe elements of the chimney systems - vertical, at an angle or horizontal - transitional elbows of different types are used to connect them.When choosing a specific sample of such a product and installing it, it is necessary to provide easy access to it. In the knees, soot accumulates in large quantities and therefore they must be periodically cleaned.
On a note! A more convenient option is the knee, the design of which provides a removable glass for cleaning.
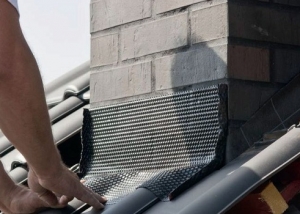
To prevent smoke from entering the room, it is necessary to ensure absolute tightness of the pipe joints. For safe laying of pipe products through a wooden ceiling, as well as the roof, nozzles are used. They are inserted into the holes cut out there. The pipe is conducted to the pipe, after which it is brought out. Since it weighs a lot, its fastening is performed by wall brackets in increments of 2 meters. The outlet of the chimney through the roof should be equipped with a sealed roof groove, which prevents the ingress of water from atmospheric precipitation into the premises of the bathhouse. To protect against snow and rain, a fungus is usually placed above the outlet of the chimney system.
What is taken into account when designing and installing the chimney
Before presenting a step-by-step guide to DIY construction of a chimney in a bathhouse, it is necessary to note key points. Among them, experts include:
- competent approach to the choice of the diameter of the chimney pipe. With a small value of this parameter, the complete removal of fuel combustion products will not be ensured. But if the cross section is very large, the bath will warm up for a long time, because the smoke moves too quickly along the wide pipe. As a result, the fire will require more time and fuel;
- the optimal form of design of the chimney system is a cylinder. It is easier to clean, it is less polluted and provides better passage of combustion products;
- the most advantageous place for placing the chimney is as close as possible to the inner wall of the bathhouse. This will provide better thermal insulation;

One of the most important points when installing a chimney is to provide insulation at the pipe passage through the ceiling
- the total height is usually indicated in the passport on the stove. If this document does not contain such information, the design height should be at least 4.5 meters;
- the chimney should rise above the roofing ridge by no less than 50 centimeters:
- the place where the pipe exits through the roof must be provided with reliable waterproofing;
- installation of a valve (gate) should be provided. Then the owner of the bath will be able to regulate traction;
- the ceiling and walls near the chimney are recommended to be additionally protected with copper sheet, basalt wool or other non-combustible materials;
- the outer surface of the elements of the chimney system can be painted or whitened.
On a note! By whitewashing you will not only give the structure a more attractive appearance, but also create a kind of leak indicator: in places where smoke will penetrate the room, the painting will darken.
How to make a chimney for a bath
Below is a step-by-step instruction for organizing a smoke exhaust system in a bathhouse.
Stage number 1. Preparatory. First of all, it is necessary to protect the places through which the smoke channel passes through the ceilings. In this section, an element called the “through pipe” is used, in other words, a pipe. Step by step steps to create it look like this:
- branch pipe preparation. This is laying along its outer surface a layer of basalt wool;
- insulation of the inner surface. Having marked the mounting point on the ceiling, we are preparing a rectangular hole for the created smoke channel in standard sizes. In those places where the structure is in contact with the ceiling, we place an additional layer of thermal insulation;
- mount the pipe;
- between this element and the smoke channel for additional heat removal we leave a minimum gap.
Stage number 2. We carry out work on the roof. We start with cutting the roof.
- we take measurements from the inside and outside taking into account the slope of the roof;
- inside the roof we cut a hole under the chimney;
- we fasten a galvanized steel sheet on the roof, in which a hole was made in advance for a chimney.

The size of the hole for the pipe to go out must exactly match its diameter
Stage number 3. Installation work. Today, the most popular is the dual-circuit system. Using her example, we will consider the steps of a step-by-step instruction for the installation of a chimney based on a sandwich module.
- The connection of the elements of the chimney system begins from the furnace. We join a sandwich module with a special output of a heat-generating unit;
- all subsequent internal modules are inserted inside the previous ones. After that, the outer pipe is put on. At the same time, it is necessary to control that the new module joins with the previous narrow end. Thanks to this technical solution, the condensate will not penetrate the joints, but will flow freely down the pipe;
- Having completed the installation of all structural elements, fix the tees with the prepared fasteners and seal all joints with clamps.
At the end of the work, the protective coating is removed and a refractory sealant is applied. On this installation of the chimney is completed.
Cleaning
This topic deserves a separate discussion. After all, the smoke channel, like any device, requires maintenance. In this case, this means cleaning it. A soot layer forms on the walls of the elements of the chimney system over time. As already mentioned above, this not only affects the cravings, but also can cause uncontrolled fire, which can cause a fire. The most effective and, accordingly, the most common way is a mechanical cleaning.

The chimney should be cleaned regularly, as soot accumulates on the walls of any pipe
Important! The fact is that not all chemical compounds are capable of effectively solving such a problem with regard to a chimney in a bathhouse.
For mechanical cleaning, the contractor will need brushes, scrapers, ruffs, which have different shapes and sizes. In some cases, you may need a special core to which the cable is attached. In order to break through sufficiently dense blockages, such a device is sometimes not enough.
It is best to start work from the top of the pipe, gradually moving down. But first of all, it is necessary to install a ladder on the roof and securely fix it. You should also tightly close the holes of the ash pan, as well as the furnace and, conversely, open all the dampers. In addition, the head is previously dismantled from the chimney. All work is carried out necessarily in a respirator.
Next, using a hard brush with iron bristles, remove the soot inside the pipe. Use a flexible brush to clean places you cannot reach with your hand. This accessory looks like a flexible cable equipped with a handle for rotation on one side, and on the other side there is a special nozzle. Its diameter should slightly exceed the value of this parameter of the pipe itself.
Move the cable through the smoke channel as carefully as possible due to the smooth rotation of the handle. If the ruff stops moving, it means that there is a dense blockage on its way, which will have to be pierced with the help of a core. Lower the core into the chimney with sudden movements. In this case, it is necessary to prevent them from touching the walls. This is especially true when the chimney system is made of brick. After removing the blockage, continue cleaning using a flexible brush.
After the accessory has passed the entire pipe through the cleaning doors, remove the soot that has fallen on top. Then, using a scraper and a brush, clean the walls of the chimney duct, moving gradually down to the location of the furnace.

All surfaces of the chimney and the furnace itself must be cleaned of ash and soot in order to prevent draft deterioration due to blockage
The chimneys of some stoves are of a direct design, with no clean doors. In this case, the soot removed from the walls of the chimney duct is lowered into the furnace. The final stage is the cleaning of the ash pan and the furnace. For its implementation, it is allowed to use a vacuum cleaner pre-equipped with a disposable paper trash bag.
At the end of the work, melt the stove and check if there is draft in the chimney and if its level is sufficient. If there are no comments, mount the previously removed cap on top of the pipe.
Chimney recommendations
To make the flue system in the bath less clogged, use only hardwood tree firewood. The coniferous firebox is dangerous because their burning is accompanied by the release of resin in large quantities. It settles on the walls of the smoke channel in the form of a dense layer of a viscous mass.
On a note! The same consequences are observed when the stove is kindled even with a small amount of diesel fuel.
Dry all wood beforehand. When burning wet wood, steam is released that:
- contributes to the accumulation of soot and soot on the walls of the chimney duct;
- destroys the chimney itself.
Completely refuse burning plastic bottles, rubber products, plastic bags, rags made of polymer materials, etc. in the oven. The reason for this recommendation is this: combustion products of various synthetics form a very dense coating on the walls of the chimney system. To clean it will require a lot of time and effort. In addition, the smoke emitted during their combustion is dangerous for all living beings - both humans and animals.
 helps to clean the chimney from soot")
Burning in the stove some types of firewood (for example, aspen) helps to clean the chimney from soot
At the end of each kindling, take the following preventative measures:
- sprinkle abundantly with salt the remaining smoldering firewood;
- burn several aspen logs in the oven.
This helps to prevent abundant subsidence in the smoke channel of the soot. However, it will not be possible to exclude the appearance of plaque there. It will be formed regardless of what kind of firewood you drown and whether you follow preventive measures.
Inspect the chimney regularly, clean it if necessary. This procedure should be approached with maximum responsibility. If the chimney channel is clogged, the stove will not be able to function normally, which can cause serious consequences, and the occurrence of a fire is not at all ruled out. If you cannot clean the chimney yourself, contact a specialist in the appropriate profile for help. It is strictly forbidden to use a stove with a heavily clogged or broken smoke channel.
It may seem to an inexperienced person in building a bath that when creating a chimney in it, you can do without the advice of outsiders. But the above information proves the correctness of the following thesis: this procedure is very responsible, requiring the study of modern techniques, the availability of skills and certain rules. Only then you will not make mistakes, and the chimney built in the bath will last long and reliably.